
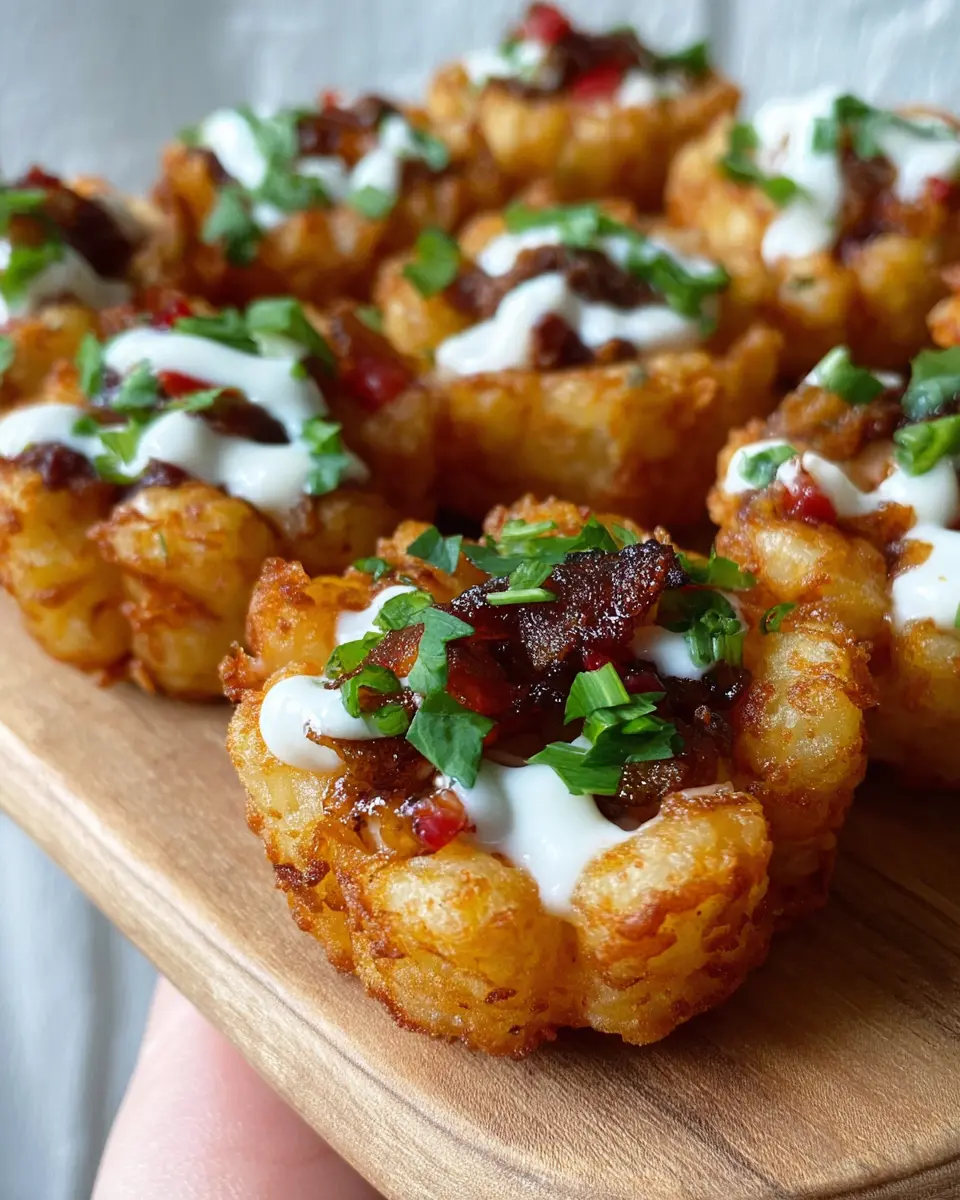
Introduction to Loaded Tater Tot Cups
If you’ve been searching for the ultimate snack that combines crispy, cheesy, and savory flavors in a fun, bite-sized form, look no further than loaded tater tot cups! These little delights are perfect for gatherings, movie nights, or just satisfying a late-night craving. They offer a unique twist on traditional tater tots by combining them with toppings that take them to the next level, like shredded cheese, turkey bacon, and zesty dips.
Why Loaded Tater Tot Cups are a Game Changer?
Imagine a warm, golden cup made of perfectly baked tater tots, filled to the brim with gooey cheese and crispy turkey bacon. What’s not to love? Loaded tater tot cups are not only easy to make but also incredibly versatile. You can customize them to your heart's content—add toppings like chicken ham, or switch up the sauces, and you have a new flavor combo every time!
These cups are consistently a crowd favorite, often disappearing before you even have a chance to grab one. Plus, prep takes only about 30 minutes, meaning you can whip them up for a last-minute get-together with ease. For more quick and delightful recipes, check out this great resource for meal ideas that impress without the fuss.
So, gather your ingredients and get ready to impress your friends with these loaded tater tot cups that are sure to become your new go-to snack!
Ingredients for Loaded Tater Tot Cups
Essential Ingredients for the Perfect Cups
Creating the ultimate loaded tater tot cups starts with these essential ingredients:
- 48 frozen tater tots – Opt for a brand that offers a nice, crispy texture. You’ll need about four tots per muffin tin cavity.
- 1 ¼ cups shredded cheddar cheese – A classic choice for that gooey, melty finish. Feel free to experiment with a blend of cheeses if you're feeling adventurous!
- ¾ cup cooked, crumbled turkey bacon – This gives a savory crunch without the excess grease. You can easily find turkey bacon in most grocery stores.
These three simple ingredients are the foundation of your loaded tater tot cups, setting the stage for a delicious appetizer.
Optional Toppings and Variations
Now, let’s talk toppings! You can personalize your cups by adding different ingredients. Here are some fun ideas:
- Diced chicken ham for a hearty twist.
- Sour cream or ranch dressing for a creamy finish.
- Garnish with either fresh parsley or chives to add a pop of color and freshness.
The beauty of these cups is their versatility! Mix and match your favorite toppings to make them uniquely yours. What are your go-to toppings?
Preparing Loaded Tater Tot Cups
Loaded tater tot cups are such a fun twist on a classic snack! They’re crispy, cheesy, and oh-so-satisfying. If you’ve ever wondered how to create that perfect cup shape using tater tots, we’ve got you covered. Let's dive into the preparation process for these tasty treats.
Gather Your Equipment
Before you get into the fun part of cooking, it’s essential to gather the right tools. You’ll need a few key pieces of equipment to make your loaded tater tot cups. Here’s what you’ll need:
- Baking Sheet Pan: A versatile pan that helps with the initial baking of your tater tots.
- Cheese Grater: For grating fresh cheddar cheese, which melts beautifully.
- 12-Cup Muffin Tin: The magic tool that molds your tater tots.
- Shot Glass: Perfect for shaping your tot cups. Who knew a simple glass could do so much?
Having these items ready to go will make your cooking experience smoother and more enjoyable!
Preheat the Oven and Prepare the Muffin Tin
Start by preheating your oven to 425 degrees F. A hot oven is crucial for achieving that delicious crispness we all crave in our loaded tater tot cups. While the oven warms up, it’s time to prep your muffin tin. Grease each cup with cooking spray, olive oil, or melted butter to ensure your tasty creations don’t stick.
Bake the Tater Tots
Once your oven has reached the desired temperature, place four frozen tater tots into each muffin tin cavity. Keep it simple; align them neatly so they can bake evenly. Pop the muffin tin into the oven and let the tots bake for about 10 minutes. This step is vital for softening the tots without fully cooking them.
Mold Your Tater Tot Cups
After baking, it’s time for some fun! Take your shot glass and carefully press down in the center of each batch of tater tots to mold them into cup shapes. This is where your creativity shines—don’t be afraid to make those cups a little deep for more filling later on.
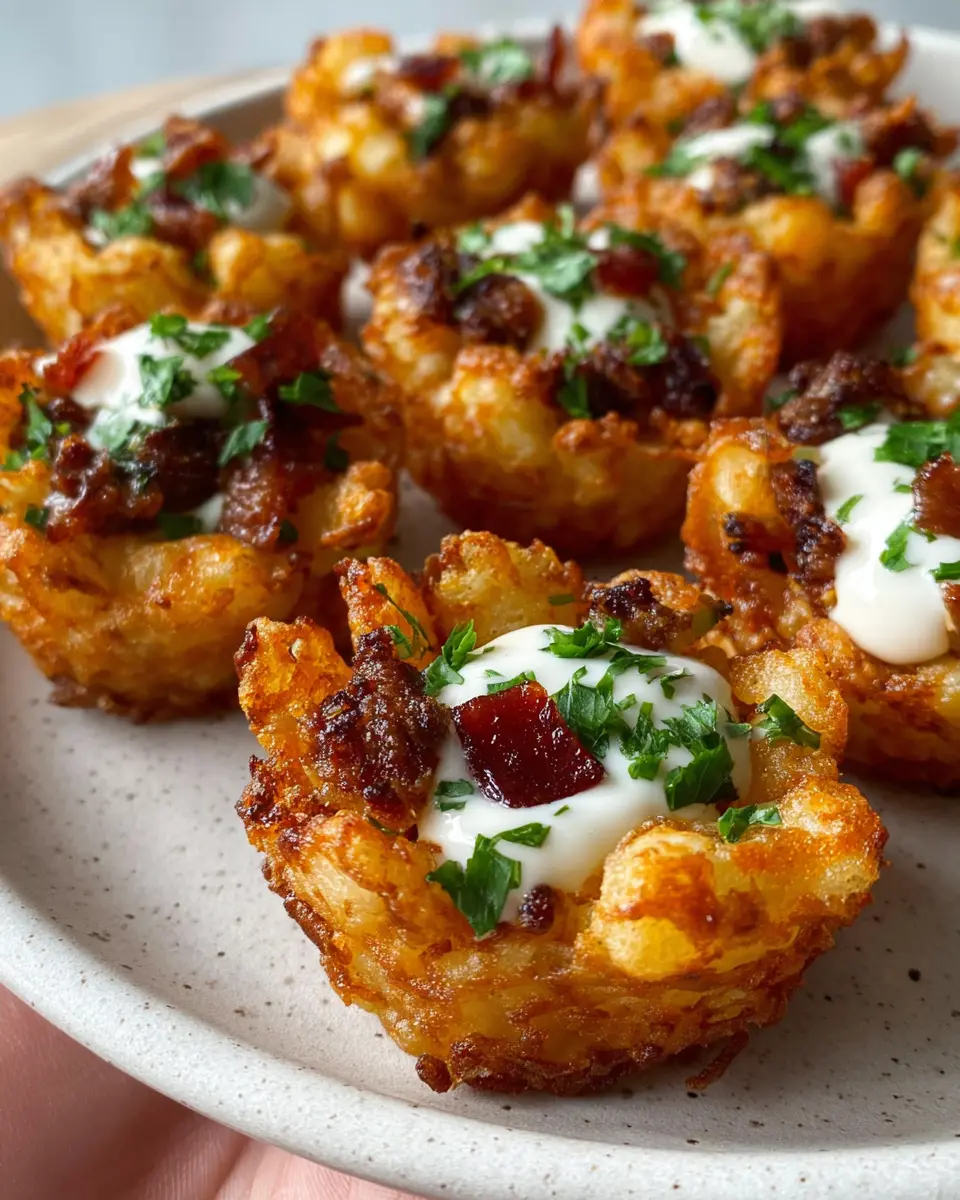
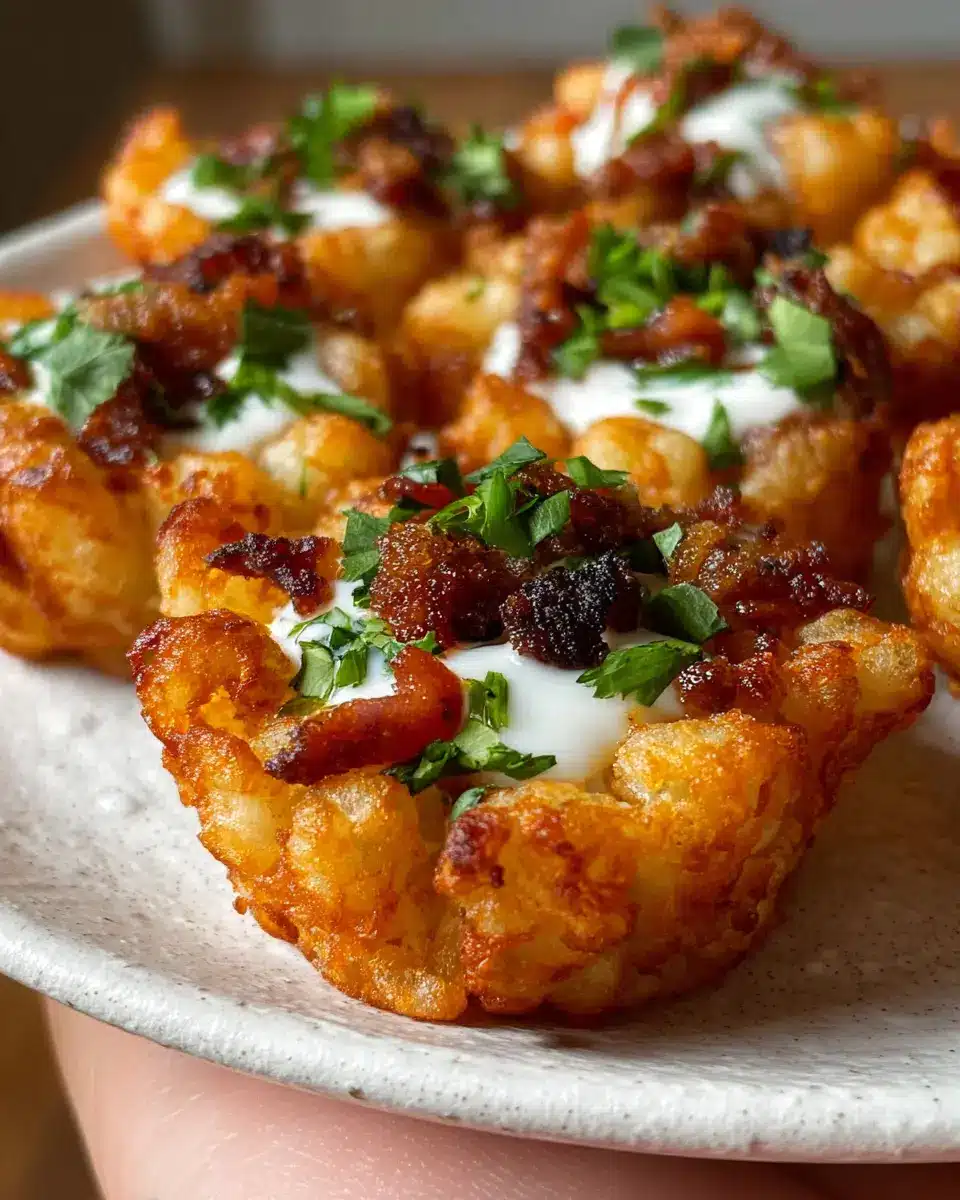
Add Cheese and Turkey Bacon
Now for the best part! Sprinkle a generous amount of freshly grated cheese over each tater tot cup. You can never have too much cheese! Add crumbled turkey bacon for that savory kick. If you’re a fan of chicken ham, go ahead and throw some of that into the mix for an extra flavor boost.
Final Bake for That Perfect Crispiness
Once everything is assembled, pop the muffin tin back in the oven and bake for another 15-20 minutes. Keep an eye on them until the cheese is bubbly and the edges of the cups turn a delightful golden brown. This final bake is your ticket to achieving that perfect balance of crispy and gooey goodness!
When you’re done, top off your loaded tater tot cups with a dollop of sour cream or ranch dressing and sprinkle with parsley or chives for that professional touch. Serve them up, and watch how quickly they disappear—everyone will be coming back for seconds!
Variations on Loaded Tater Tot Cups
Get ready to elevate your loaded tater tot cups with these fun variations that cater to different tastes!
Spicy Loaded Tater Tot Cups
Add a kick to your classic recipe by mixing in jalapeños or diced green chilies with the cheese and turkey bacon. You can also sprinkle some cayenne or chili powder on top before baking for that extra heat. Serve them with a side of sriracha or spicy ranch for dipping, and watch these zesty bites disappear at your next gathering! For a flavor explosion, consider topping them with a dollop of guacamole too.
Veggie-Packed Tater Tot Cups
Want to make your loaded tater tot cups a bit healthier? Incorporate veggies like chopped bell peppers, spinach, or corn into the mix. Not only does this add some color, but it also boosts the nutritional value of your snack. Try swapping turkey bacon for a layer of diced chicken ham for another delicious spin. You won’t believe how irresistible these veggie-infused cups can be!
For tips on customizing these to your taste, check out resources from Serious Eats or The Kitchn.
Cooking Tips and Notes for Loaded Tater Tot Cups
How to Achieve Optimal Crispiness
For perfectly crispy loaded tater tot cups, start with a preheated oven at 425°F and be sure to leave space between the muffin tin cavities. Press the tater tots using a shot glass after their initial bake to maximize the surface area that gets crispy during the second bake. Also, misting the tots lightly with cooking spray can enhance crispiness.
Suggestions for Ingredient Swaps
Feel free to get creative with your ingredients! If you want to cut back on calories, swap out regular cheese for a low-fat option, or use Turkey Bacon instead of traditional bacon for a lighter alternative. You can even experiment with different toppings like chicken ham or a drizzle of spicy sauce. Check out this guide on cheese varieties for more ideas on cheese that melts perfectly!
Serving Suggestions for Loaded Tater Tot Cups
Best Dipping Sauces to Pair With Your Cups
When indulging in your loaded tater tot cups, you'll want the perfect dip to enhance each bite. Classic options like sour cream or tangy ranch dressing can complement the savory flavors beautifully. If you're feeling adventurous, consider adding some spicy aioli or guacamole for a refreshing twist. Don’t overlook the sweet and smoky flavors of BBQ sauce; it's a crowd favorite that pairs surprisingly well!
Ideal Side Dishes to Complement the Snack
While loaded tater tot cups are definitely the star of the show, you can enhance your spread with some simple side dishes. Fresh vegetable platters with crunchy carrots and bell peppers add a vibrant touch and balance out the richness. If you crave something warm, consider serving chicken wings or deviled eggs. They’re easy to prepare and will keep the party atmosphere going! Don't forget a mixed greens salad for a light and refreshing contrast to your delicious tater tots.
Time Breakdown for Loaded Tater Tot Cups
Preparation Time
Getting everything ready for your loaded tater tot cups takes about 30 minutes. This includes greasing the muffin tin, preparing your toppings, and arranging the tater tots—easy peasy!
Baking Time
Once your tater tots are in the muffin tins, you'll bake them for a total of 25-30 minutes. That’s just enough time for them to become golden and crispy.
Total Time
In just about 30 minutes, you’ll have full plates of these delicious loaded tater tot cups. Perfect for any gathering or a movie night at home!
Nutritional Facts for Loaded Tater Tot Cups
When you're gathering with friends or hunting for a satisfying snack, these loaded tater tot cups are sure to delight! Here’s a quick look at their nutritional profile:
Calories
Each loaded tater tot cup has approximately 180 calories, making it a tasty yet mindful choice for your next gathering.
Protein
With 5 grams of protein per cup, these delightful bites offer a tasty boost to keep you fueled during long days.
Sodium
Be aware, though—these cups contain around 400 milligrams of sodium. Enjoy in moderation, especially if you're watching your salt intake.
Feel free to check out more about calorie guides and nutrition tips at Healthline. Enjoy your loaded tater tot cups while keeping your health goals in mind!
FAQs about Loaded Tater Tot Cups
Can I make these ahead of time?
Absolutely! You can prepare your loaded tater tot cups up to a day in advance. Just assemble them as per the instructions, cover with plastic wrap, and store them in the fridge. When it’s time to bake, give them a few extra minutes in the oven if they're coming straight from the fridge.
What can I serve with Loaded Tater Tot Cups?
These cups are perfect on their own, but you can elevate your spread by serving them with a side of fresh veggies and dip, or pair them with a simple garden salad. If you're feeling adventurous, try them alongside some tangy chicken wings! For more ideas, check out this entertaining guide for match-made snacks.
How do I store leftovers?
If you have any leftover loaded tater tot cups, store them in an airtight container in the fridge for up to three days. Reheat them in the oven at 350°F for the best results, ensuring they regain their lovely crispiness. Enjoy your fabulous creation all over again!
Conclusion on Loaded Tater Tot Cups
In summary, these loaded tater tot cups are a must-try for your next gathering. Their crispy exterior and gooey, cheesy filling, paired with the crunch of turkey bacon, create an irresistible snack. Quick to prepare and delightfully customizable, these cups are sure to impress your guests! Enjoy!

Loaded Tater Tot Cups
Equipment
- baking sheet pan
- Cheese grater
- 12-cup muffin tin
- shot glass
Ingredients
Tater Tot Cups
- 48 pieces frozen tater tots 4 per muffin tin cavity
- 1 ¼ cups shredded cheddar cheese
- ¾ cup cooked, crumbled bacon about 6 strips
- sour cream for topping
- ranch dressing for topping
- parsley for garnish
- chives for garnish
Instructions
Cooking Instructions
- Preheat your oven to 425 degrees F, then grease a muffin tin with cooking spray, olive oil, or melted butter.
- Add 4 frozen tater tots into each muffin tin cavity, then bake for 10 minutes.
- Once baked, use a shot glass to press the tater tots into cup shapes. Sprinkle on shredded cheese and crumbled bacon, then bake for another 15-20 minutes.
- Top with your choice of sour cream or ranch dressing, then garnish with parsley or chives before serving!
- If using fresh bacon, bake at 425 degrees for 25 minutes and about 15 minutes if using thin bacon. Transfer the crispy bacon to paper towels to drain off excess grease and chop it up to make bacon crumbles.


Leave a Reply