
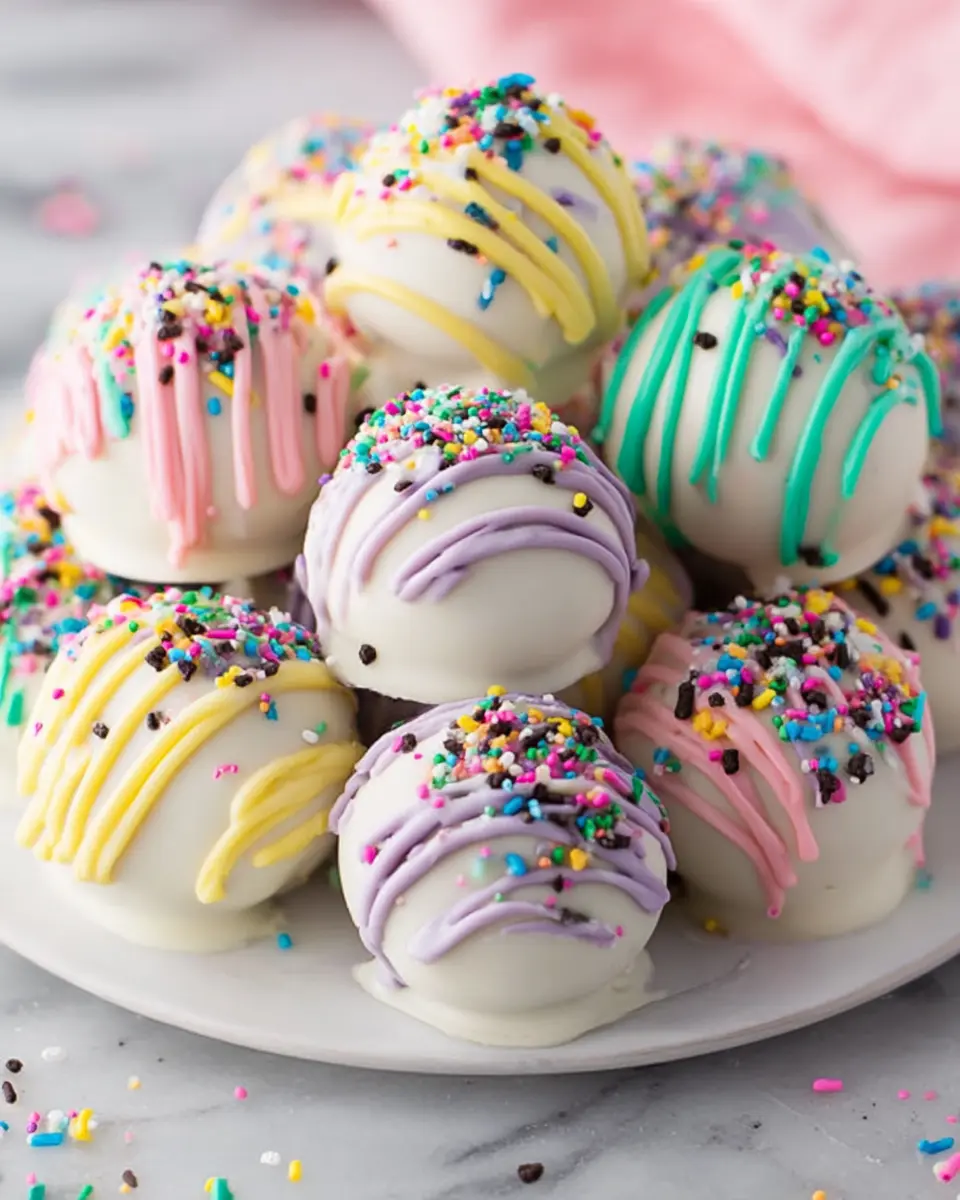
Introduction to Easter Egg Oreo Cookie Balls
Spring is in the air, and Easter is just around the corner! What better way to celebrate than with Easter Egg Oreo Cookie Balls? These delightful treats combine the classic taste of Golden Oreos and creamy goodness from cream cheese, creating a dessert that's both easy to make and a joy to eat.
Why are Easter Egg Oreo Cookie Balls the perfect treat for spring?
There’s something magical about making sweets during the festive season. The vibrant colors of spring inspire creative decorating options that kids and adults alike can enjoy. Plus, these cookie balls offer a perfect balance of flavors and textures—sweet, crunchy, and creamy—all rolled into a charming Easter egg shape.
Crafting these treats can be a fun, family-friendly activity. It’s an excellent opportunity for parents to involve their kids in the kitchen, sparking their creativity while creating something delicious. As you hover around the mixing bowl, it's a great time to connect, laugh, and, of course, sneak a bite or two!
For tips on decorating and more fun spring dessert ideas, check out resources such as the American Baking Guild. So, gather your ingredients and get ready for an Easter treat that’s sure to be a hit.

Ingredients for Easter Egg Oreo Cookie Balls
Creating Easter Egg Oreo Cookie Balls is a delightful way to celebrate the season while indulging in a yummy treat. Whether you’re hosting an Easter brunch or looking for a fun activity to do with friends, this recipe covers all your bases. Below, we delve into the main ingredients and decoration essentials to get you started.
Main Ingredients
- 14.3 oz Golden Oreos: These provide the base flavor and texture for your cookie balls, creating a rich and creamy filling.
- 8 oz cream cheese: Make sure it's at room temperature! This creamy ingredient binds everything together and adds a delicious richness.
- 10 oz white candy coating: Use this for dipping your cookie balls, giving them a beautiful, sweet shell.
Decoration Ingredients
- 1 oz additional white candy coating: This is necessary per color you plan to use for decorating your Easter Egg Oreo Cookie Balls.
- Gel icing colors: Pick your favorite colors to make your treats pop! The decorating process can be just as fun as eating them.
Making these will surely bring smiles all around. For more tips on making the perfect treats, check out The Spruce Eats for expert baking advice. Enjoy creating these colorful delights!
Preparation of Easter Egg Oreo Cookie Balls
Creating delightful Easter Egg Oreo Cookie Balls is not just about the final treat; it's about enjoying the process and sharing special moments in the kitchen. Let’s take a closer look at each step to ensure your Easter celebration is fun and flavorful!
Step 1: Prepare your ingredients
Before diving into the fun, gather all your ingredients. You’ll need:
- 14.3 oz Golden Oreos (crushed)
- 8 oz cream cheese (at room temperature)
- 10 oz white candy coating
- 1 oz additional white candy coating per color (for decorating)
- Gel icing colors
Having everything ready allows you to flow smoothly from one step to the next. This can also be a perfect moment to involve your little ones—let them help you measure out the ingredients! You can check the nutritional value and other tips on Eatright.org to make it a learning experience as well.
Step 2: Crush the Golden Oreos
Using a food processor or a blender, crush the Golden Oreos into fine crumbs. Aim for a consistency somewhat resembling sand. If you don’t have either handy, placing the cookies in a resealable plastic bag and crushing them with a rolling pin is just as effective. The sound of crunching Oreos is like music to any dessert lover's ears!
Step 3: Mix cream cheese with Oreo crumbs
In a large mixing bowl, combine the cream cheese with your Oreo crumbs. The key here is to blend them well until you have a consistent, dough-like texture. This mixture should be moist enough to hold together when you form your shapes but not too sticky. If it feels a bit too wet, sprinkle in more Oreo crumbs. A perfect time for a taste test to ensure it’s as delicious as it sounds!
Step 4: Form the Easter egg shapes
Using about 1 ½ tablespoons of the cookie and cream cheese mixture, shape your mixture into cute little egg forms. This is a great step for kids to get involved in! Don’t worry about making them perfect. Each egg will have its own charm and personality, just like the people enjoying them!
Step 5: Chill the eggs
Once you’ve formed your Easter egg shapes, place them on a parchment-lined baking sheet and pop them in the refrigerator for about 1 hour. Chilling helps solidify the eggs, making them easier to dip later.
Step 6: Dip in melted candy coating
While your eggs chill, it’s time to melt the white candy coating. You can do this in a microwave-safe bowl in short intervals, stirring between each burst until smooth. Once melted, it’s time to dip those chilled eggs into the candy coating. Use a fork to help coat them evenly, and let the excess drip off before placing them back on the parchment paper.
Step 7: Decorate with gel icing colors
Once the candy coating has dried, unleash your inner artist! Use gel icing colors to add fun designs to your Easter Egg Oreo Cookie Balls. Whether you opt for simple stripes or elaborate patterns, this is where your creativity shines through. It’s a delightful way to add color and personality to each egg!
There you go! Each step brings you closer to an exciting, edible masterpiece that everyone will enjoy. Want to learn more tips about Easter treats? Check out Food Network's Guide for some creative inspirations!

Variations on Easter Egg Oreo Cookie Balls
Coconut Easter Eggs
Looking to add a tropical twist to your Easter Egg Oreo Cookie Balls? Consider making coconut Easter eggs! Simply mix shredded coconut into the cookie and cream cheese mixture before shaping them into eggs. After dipping in white candy coating, sprinkle extra coconut on top for that delicious, sweet crunch. Your guests will love this refreshing flavor!
Chocolate-Covered Oreo Eggs
For the chocolate lovers in your life, why not go for chocolate-covered Oreo eggs? Replace the white candy coating with dark chocolate or milk chocolate. After molding the eggs, dip them in the melted chocolate, allowing it to harden. If you're feeling adventurous, drizzle some white chocolate on top for a beautiful and tasty finish.
Whichever variation you choose, these Easter Egg Oreo Cookie Balls are sure to impress! For more fun ideas, check out burstingwithflavor.com’s festive recipes.
Baking Tips for Easter Egg Oreo Cookie Balls
Ensure cream cheese is room temperature
Using cream cheese at room temperature is crucial for achieving a smooth and creamy mixture. Cold cream cheese can result in lumps, making it difficult to combine with the Oreo crumbs. Simply take it out of the fridge about an hour before you start baking. This small step can make your Easter Egg Oreo Cookie Balls far more delicious!
Use various colors for decoration
Don’t hold back when it comes to decorating your treats! Use a mix of gel icing colors to create vibrant designs on your Oreo cookie balls. You can even let your creativity shine by involving kids in the decorating process—what’s more fun than a colorful Easter treat? Plus, different colors can represent various Easter themes, making your treats even more festive. For more decoration inspiration, check out these fun ideas here.
Serving suggestions for Easter Egg Oreo Cookie Balls
Perfect for Easter gatherings
These delightful Easter Egg Oreo Cookie Balls are a hit at any Easter gathering. Serve them on a festive platter alongside fresh fruit or other seasonal treats to create a colorful spread. You can even add a creative touch by labeling each egg with fun names, encouraging guests to guess the flavors. Check out some decorating ideas at Delish for more inspiration!
Great for kids' parties
Made with simple ingredients, Easter Egg Oreo Cookie Balls are undeniably kid-friendly. Get the little ones involved in the decorating process—let them pipe colorful icing or sprinkle edible glitter for a fun activity. You might just spark a love for baking in your child! Plus, these treats offer a delightful balance of sweetness and the classic cookie flavor everyone loves.
Time Details for Easter Egg Oreo Cookie Balls
Preparation Time
To get started on your Easter Egg Oreo Cookie Balls, you'll need about 30 minutes for preparation. This includes crushing the Oreos, mixing in the cream cheese, and shaping the mixture into festive egg forms.
Chilling Time
After shaping, you'll want to let the egg balls chill in the fridge for 1 hour. This step is crucial as it helps the balls firm up, making them easier to dip in the candy coating.
Total Time
All in all, you’ll need approximately 3 hours to complete your Easter Egg Oreo Cookie Balls, including both prep and chilling times. This makes them a fun and engaging treat to whip up during a leisurely weekend or a family gathering!
These delightful treats are great for an Easter gathering with friends or as a fun project to do with kids. For a quick reference, you might also want to check out these baking time essentials to help streamline your prep process!
Nutritional Information for Easter Egg Oreo Cookie Balls
Calories
Each delightful Easter Egg Oreo Cookie Ball contains approximately 150 calories. This makes them a tasty yet indulgent treat to enjoy in moderation!
Total Servings
This recipe yields around 22 serving-sized eggs, perfect for sharing at Easter gatherings. Why not surprise your friends and family with this fun dessert? You’ll have everyone talking about your culinary creativity! For more insights into balanced treats, check out the American Heart Association for some additional inspiration.
FAQs about Easter Egg Oreo Cookie Balls
Can I make these a day in advance?
Absolutely! In fact, making Easter Egg Oreo Cookie Balls a day ahead can enhance their flavor as they chill. Just follow the recipe, and once you’ve formed the eggs and dipped them in the candy coating, store them in an airtight container in the fridge until you're ready to enjoy them.
How should I store leftovers?
To keep your Easter Egg Oreo Cookie Balls fresh, simply place any leftovers in an airtight container lined with parchment paper to avoid sticking. They can be refrigerated for up to a week. Just make sure to let them come to room temperature for a few minutes if you'd like to enjoy them at their best texture!
Can I substitute for gluten-free Oreos?
Yes, you can easily substitute regular Oreos with gluten-free Oreos. Many brands offer gluten-free options, so you can still indulge in these delightful treats without worry. Check out gluten-free versions at your local grocery store or online for a tasty alternative!
For more tips on ingredient substitutions, feel free to explore resources like Gluten Free & More.
Conclusion on Easter Egg Oreo Cookie Balls
Why you should try making these delightful treats this Easter!
These Easter Egg Oreo Cookie Balls are simply irresistible and a fantastic way to celebrate the joy of Easter. Perfect for both kids and adults, they offer a fun, hands-on activity. Imagine the delight of decorating them in vibrant colors and sharing them with loved ones during an Easter gathering. Plus, they're no-bake! You can whip them up quickly and spend more time enjoying the holiday. So grab those Golden Oreos, and let the fun begin! For more Easter treats, don’t miss out on this fun cupcake recipe or check out these creative Easter crafts to make your celebration even more memorable.

Easter Egg Oreo Cookie Balls: Fun Easter Treat
Equipment
- Food processor
Ingredients
Main Ingredients
- 14.3 oz Golden Oreos crushed into crumbs
- 8 oz cream cheese room temperature
- 10 oz white candy coating
Decoration Ingredients
- 1 oz additional white candy coating per color, for decorating
- gel icing colors
Instructions
Main Instructions
- Add the Golden Oreo cookies to a food processor or blender and crush into crumbs.
- Mix the cream cheese and cookie crumbs together in a bowl until well combined. You should easily be able to form balls.
- Form Easter eggs from the cookie mixture using about 1 ½ tablespoons per egg.
- Put the eggs in the fridge for about 1 hour to firm up a bit.
- Melt the 10 ounces of white candy coating and dip the chilled eggs into the melted candy coating. Set on parchment paper to dry.
Decoration Instructions
- Once dry, add the decorations with gel icing colors. Pipe or drizzle the colors over the Oreo eggs.

Leave a Reply